You do not need to buy a PDF to get real lifeguard chair plans.
This guide gives you the complete build for free: a materials table, a labeled cut list, and eight steps that take one weekend with basic tools.
The design uses nothing but 2x4s, which keeps the cost under $100 and the skill level firmly beginner.
You get a 48-inch seat height, a sturdy ladder, and a backrest built for poolside lounging.
Grab the printable PDF below, or scroll straight to the cut list.
Key Takeaways
- These free lifeguard chair plans use only 2×4 lumber, so you need about twelve 8-foot boards and one weekend.
- The finished chair stands 74 inches tall with a 48-inch seat height, a built-in ladder, and a full backrest.
- Total cost lands between $80 and $100 with exterior screws, glue, and stain included.
- A printable PDF with the complete cut list and step-by-step diagrams is free to download below, no email required.
- Prefer a different style? Seven alternative designs are covered at the end, including recycled lumber and tall Adirondack versions.
Table of Contents
- Key Takeaways
- What You Are Building: Specs At A Glance
- Materials and Tools
- Cut List For The Lifeguard Chair
- Download The Free Lifeguard Chair Plans PDF
- Safety Notes Before Anyone Climbs Up
- 7 Alternative Lifeguard Chair Designs
- 1. DIY Lifeguard Chair From My Outdoor Plans
- 2. DIY Lifeguard Chair From Recycled Lumber
- 3. Build A Lifeguard Beach Chair
- 4. DIY Lifeguard Stands Plan By Suzy Homesteader
- 5. DIY Tall Adirondack Chair By April Wilkerson
- 6. Bar Height Adirondack Chair Plan
- 7. Bar Height Adirondack Chair By Woodworkers Journal
- FAQs
- Bottom Line
What You Are Building: Specs At A Glance
Before you buy a single board, here is exactly what the finished chair looks like on paper.
| Spec | Measurement |
|---|---|
| Overall height | 74 inches |
| Seat height | 48 inches |
| Seat platform | 26 in wide x 24 in deep |
| Footprint | 26 in wide x 24 in deep |
| Ladder | 3 treads, 12 in apart |
| Weight capacity | 300+ lbs |
| Lumber | 2x4s only (twelve 8-ft boards) |
| Skill level | Beginner |
| Build time | 6 to 8 hours across a weekend |
| Cost | $80 to $100 |
That 300-pound rating is conservative for this frame. A single vertical 2×4 supports far more than that in compression, and this chair puts four of them under the seat.
Materials and Tools
One trip to the lumber yard covers this entire build.
Materials
| Item | Quantity | Est. Cost |
|---|---|---|
| 2×4 x 8 ft, cedar or pressure-treated | 12 boards | $60 to $72 |
| 2½-inch exterior wood screws | 1 lb box (~150) | $10 |
| 3-inch exterior wood screws | 50 count | $8 |
| Exterior wood glue | 1 bottle | $6 |
| Sandpaper (80, 120, 220 grit) | 3 sheets each | $8 |
| Exterior stain or sealer | 1 quart | $15 |
Buy one extra 2×4 if you want a cushion for a miscut. Cedar costs more than pressure-treated pine but looks better bare and weighs less.
Tools
- Circular saw or miter saw
- Drill/driver with a countersink bit
- Speed square and tape measure
- Level and clamps
- Orbital sander (or a sanding block and patience)
Cut List For The Lifeguard Chair
Every part comes from a standard 8-foot 2×4. Label each piece with a pencil as you cut, because parts D and F are the same length for different jobs.
One board note: the two front legs (B) come out of a single 96-inch board, so the saw kerf leaves the second leg a hair under 48 inches. That is fine, just cut both legs to match each other.
| Part | Name | Qty | Cut Size (2×4) |
|---|---|---|---|
| A | Back legs | 2 | 74 in |
| B | Front legs | 2 | 48 in |
| C | Side rails | 6 | 17 in |
| D | Front/back rails | 4 | 23 in |
| E | Seat slats | 5 | 26 in |
| F | Ladder treads | 3 | 23 in |
| G | Back slats | 3 | 26 in |
| H | Armrests | 2 | 26 in |
| I | Armrest posts | 2 | 10 in |
| J | Rear diagonal braces | 2 | 32 in, ends cut at 45° |

Step 1: Cut All Parts To Size
Cut everything before you drive a single screw. Batch-cutting keeps matching parts identical, which matters most for the four legs.
A miter saw is fastest, but a circular saw and a speed square work fine.
Sand each piece with 80 grit now. Sanding flat boards on sawhorses beats sanding an assembled chair every time.
Step 2: Build The Two Side Frames
Each side frame is one back leg (A), one front leg (B), and three side rails (C).
Lay a back leg and front leg parallel on a flat surface with a 17-inch gap between them and the bottoms flush, which makes the frame 24 inches deep outside to outside.
Glue and screw the three rails between them: bottom rail 6 inches up from the floor, middle rail at 27 inches, and seat rail with its top edge at 46½ inches.
Use two 3-inch screws per joint and check each rail with a speed square before driving the second screw. Build the second side frame as a mirror image of the first.

Step 3: Connect The Frames With Front and Back Rails
Stand both side frames upright, 23 inches apart on the inside.
Screw two rails (D) between the front legs and two between the back legs, matching the heights of the bottom and seat side rails. Clamps or a helper make this step far easier.
Check the frame for square by measuring both diagonals across the seat opening. Adjust until the two measurements match, then snug every screw down.
Step 4: Install The Seat Slats
Lay the five seat slats (E) flat across the seat rails, front to back.
Space them with 1½-inch gaps, which is exactly the thickness of a 2×4 scrap. The slats overhang the side rails slightly on each side, which sheds rain and looks intentional.
Glue and screw each slat with two 2½-inch screws per end. Countersink every screw head so nothing catches a swimsuit.

Step 5: Add The Ladder Treads
The front legs double as ladder rails. Screw the three treads (F) flat between the front legs at 12, 24, and 36 inches off the ground.
The seat itself acts as the final step at 48 inches. Use two 3-inch screws per tread end, driven through the leg faces, plus glue.
Treads carry full body weight on a small area, so do not skip the glue here.

Step 6: Install The Back Slats
Screw the three back slats (G) across the back legs at 54, 60, and 66 inches off the ground.
Attach them to the front face of the legs so your back rests on flat boards, not edges. Keep the spacing even, roughly 2½ inches between slats, and the look stays clean.
Step 7: Attach The Armrests
Screw an armrest post (I) to the outside of each front leg, rising 10 inches above the seat.
Lay each armrest (H) flat from the back leg to the top of the post, level with the ground. Screw down into the post and back into the leg with 2½-inch screws.
Step 8: Brace, Sand, and Finish
Screw the two diagonal braces (J) from the back legs down to the bottom rear rail, forming a V. These kill any side-to-side racking when someone climbs in.
Sand the whole chair to 120 grit, then hit the seat, arms, and treads with 220. Ease every corner and edge your hands or legs will touch.
Finish with two coats of exterior stain or sealer. Recoat once a year if the chair lives in full sun.
Download The Free Lifeguard Chair Plans PDF
The printable PDF version of these plans includes the specs table, the materials list, the full cut list, all eight steps, and all four build diagrams in a shop-friendly layout.
Download the Free Lifeguard Chair Plans PDF
Safety Notes Before Anyone Climbs Up
A 48-inch seat height is high enough to get hurt falling from. Three rules keep this build safe.
- First, always climb facing the ladder, the same way you would a stepladder.
- Second, set the chair on firm, level ground, never on soft grass with two legs sinking.
- Third, if kids will use it, anchor the back legs to a deck or fence post with a metal strap.
Inspect the screws at the start of each season. Wood moves outdoors, and a five-minute retighten keeps every joint solid.
7 Alternative Lifeguard Chair Designs
The 2×4 build above is the fastest route to a finished chair, but it is not the only good design. These seven plans from the original roundup cover different budgets, materials, and heights.
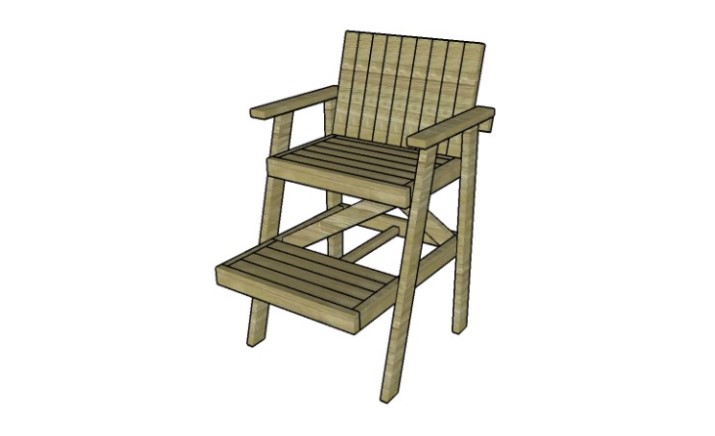
1. DIY Lifeguard Chair From My Outdoor Plans

First of all, this plan only consists of 2x4s. So, it is an ideal starting project for woodworking beginners.
After all, you won’t need to struggle with a multitude of differently-sized planks. That is why the time necessary is only one day.
This plan focuses the most on being structurally sound.
The front legs are slightly cut at 75 degrees on both ends, ensuring that they can stabilize easier when you fix them into the frame.
Also, the seat has a middle supporting piece so that the planks put on top of it do not crack down the middle under high pressure.
The supports for the backrest have a specific 15-degree angle cut. With this angle, the backrest has a comfortable slope for the lifeguard to relax fully.
Project details: myoutdoorplans.com
2. DIY Lifeguard Chair From Recycled Lumber
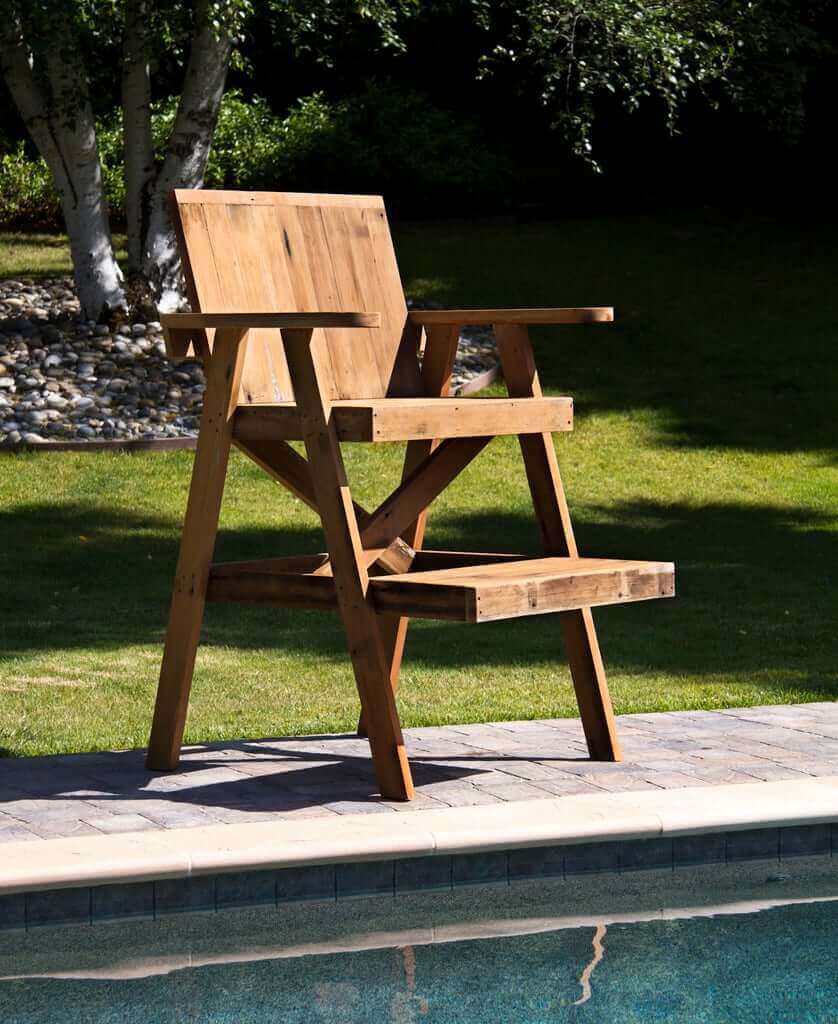
The idea behind this project is to build a strong lifeguard chair out of the cheapest materials possible. For that reason, recycled lumber is the main material and easy to find.
Unlike most lifeguard chair projects, this one starts with the backrest, not the base.
From then, you can figure out the seat’s size and the frame. Doing so leaves you lots of freedom to decide on the space.
This project also makes use of the usual X-shape support system. It consists of 2 supporting pieces crossing each other and nailed together.
As such, it can increase add strength and rigidity to the chair.
Project details: instructables.com
3. Build A Lifeguard Beach Chair
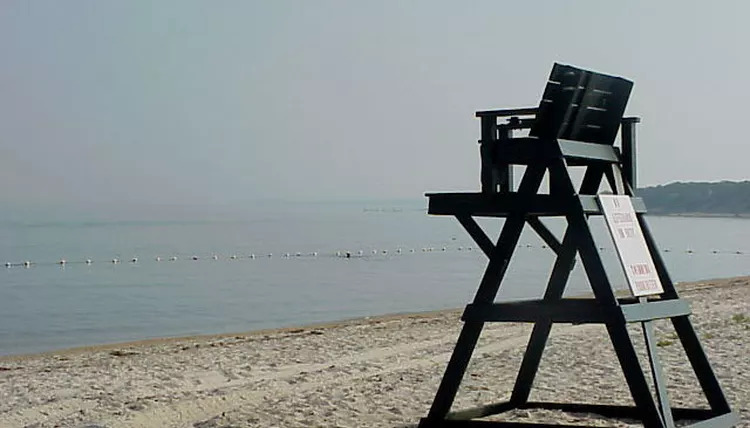
The special thing about this project is that you can customize its height depending on your needs. Depending on your needs, you can build the chair at 72 inches and more.
You need to cut the legs according to the desired length, and the stability of the chair will stay the same.
For this plan, you will build a 36-inch chair. The angle can decide the seat size. With 36-inch legs at 80 degrees mean your seat will be 20 inches in depth and 24 inches in width.
Of course, a tall lifeguard chair needs a ladder for you to climb up, and this project provides a quick and efficient solution.
Simply build one by cutting out 24-inch 2x4s and screw it into the front legs at each halfway point.
Next, you need the seat, which can be built by assembling 5 24-inch 1x4s on top of the base. To ensure that the seat is stable and strong, remember to use 1 1/4″ screws.
Finally, assemble part backrest, sides front and back corners, and armrests of the chair. You are done!
Project details: sportsrec.com
4. DIY Lifeguard Stands Plan By Suzy Homesteader
The first thing you will notice about this project is that it is huge. The whole thing takes up a 4×5 feet area. As such, it provides the sitter with ample space for resting while observing.
Of course, the support pieces must be stronger than normal to support such a huge seat. That is why you will use 2x6s and 2x4s for this project.
After all, the smaller materials lack sufficient structural integrity while the larger ones are too heavy.
Another special aspect of this stand is its ladder, which also serves to stabilize the whole stand.
The high length also means that the chair is most suitable for large-scale swimming pools.
5. DIY Tall Adirondack Chair By April Wilkerson
This plan specifically asks that you use cedar to ensure that the chair can last a while under the harsh outdoor environment.
You will start with the seat by tracing its support template, then the slats, attach them together with waterproof glue and stainless steel screws.
Remember to not leave the slats in an overhanging position, or else they will get in the way later.
Next, you work on the base assembly, which will be built with the help of wooden joints and wood glue.
You do need some screws, but they will be hidden on the inside, granting the chair a streamline and clean appearance.
Finally is the back assembly, which has a special arching back support. This arch lets the back slats hug your back, improving comfort.
6. Bar Height Adirondack Chair Plan
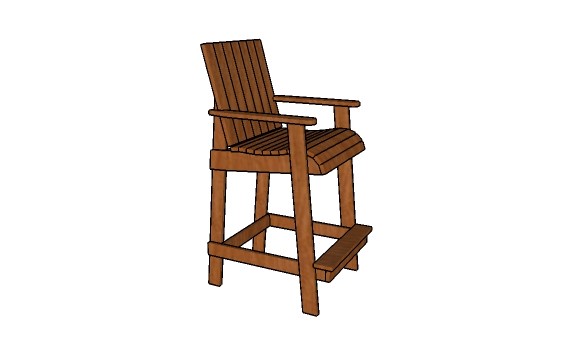
Strictly speaking, this chair is not designed as a lifeguard chair on the beach. However, its performance as one is just too good to seat for swimming pool around the home or outdoor area.
Unlike the above Adirondack chair project, this one starts with the legs. After cutting them out of 1x3s, you will add in a support rectangle setup to keep the legs stable under heavy pressure. This design makes sure that the chair will not topple.
Then, you fit in the seat and its seat slats. Remember to use only 1x2s and pay attention while aligning them.
In the same vein, we need the backrest to be stronger, so the back slats will be made from 1x3s while the supporting pieces are 1x2s.
The whole frame connects together by 1 1/4″ and 1 5/8″ screws through drill pilot holes. That is why the frame is much stronger than what you would expect from its appearance.
Project details: howtospecialist.com
7. Bar Height Adirondack Chair By Woodworkers Journal
A good lifeguard chair must let its users get out as quickly as possible. It must also keep its comfort. That is why this project incorporates only the best aspects of Adirondack chairs.
You will build the seat section with the typical Adirondack curvy seat rails. This curve ensures that the sitter feels as comfortable as possible.
Another interesting thing about this project is the fact that every single screw hole is covered by wooden plugs.
Doing so minimizes the risk of the screws going bad from the outside world’s environment and highly aesthetic.
FAQs
How tall should a lifeguard chair be?
Backyard lifeguard chairs work best with a seat height of 45 to 50 inches, which puts adult eye level around 7 feet. Commercial pool chairs sit higher, but 48 inches gives clear sightlines over a residential pool without making the climb risky.
How much does it cost to build a lifeguard chair?
Expect $80 to $100 for this 2×4 build, including lumber, exterior screws, glue, and a quart of stain. Cedar pushes the total toward $120, while recycled lumber can drop the cash cost to almost nothing.
What is the best wood for a lifeguard chair?
Cedar is the best all-around choice because it resists rot naturally and stays cooler in the sun. Pressure-treated pine costs less and lasts outdoors, but let it dry several weeks before staining and always seal cut ends.
How long does it take to build a lifeguard chair?
Plan on 6 to 8 hours of actual work for a first-time builder, split across a weekend. Cutting and sanding take the first session, assembly the second, and finishing adds an hour plus drying time between coats.
Bottom Line
A real lifeguard chair is one of the most satisfying weekend builds you can do with a single stack of 2x4s.
We hope the my DIY lifeguard chair plan, as well as the options we have presented, meet your preferences.
Every single option will surely be worth the effort and time you spend on them with their unique strengths.
For example, some can be built in just a few hours, while others are towering in both height and weight. Some are made from recycled wood, saving quite a bit for your wallet.
Remember that a good lifeguard chair makes quite a big difference. It provides the lifeguard with a strategic vantage point and some comfort during their shift.
In turn, they will be able to detect issues at a much faster and more accurate rate.



![9 Best Pole Saws of 2023 [Ultimate Guide] 9 Best Pole Saws of 2023 [Ultimate Guide]](https://handykeen.com/wp-content/uploads/2021/03/best-pole-saw-300x200.jpg)